SystemMen - After you’ve successfully installed the Zimbra mail server, you need to think about protecting it.
And the first thing is a firewall. In this article, I will guide you to configure IPTables firewall for Zimbra mail server.
Requirements set
First, this article only applies to single servers, if you run mail systems with multi servers, you need to do more.
Warning: This post only apply to single server. Please check carefully before applying to your server.
Zimbra environment:
- OS: CentOS Linux release 7.6.1810 (Core)
- Zimbra version: Release 8.8.12_GA_3794.RHEL7_64_20190329045002 RHEL7_64 FOSS edition, Patch 8.8.12_P1 proxy
Zimbra mail server when operating will open quite a lot of service ports. There are some services that need to be public and some services are not needed.
The basic requirement is that users can access the web (or use outlook) to send mail and receive mail. Very simple.
The ports Zimbra needs
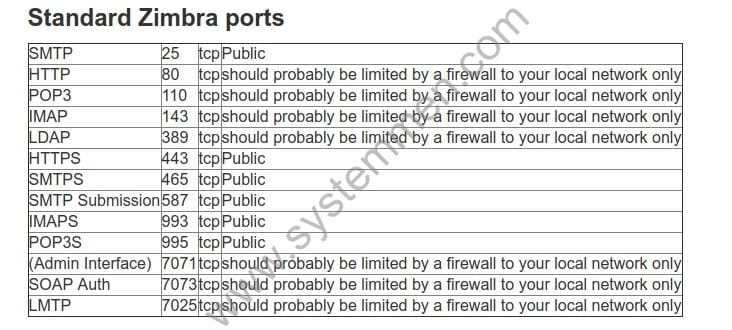
From the Zimbra firewall configuration document, I have this image to visualize the ports Zimbra needs.

Through the image above, you can also see that Zimbra has commented on the ports that should be limited to the LAN.
Why use IPTables?
Although I am using CentOS 7 server, this OS uses Firewalld but I want to use IPTables to protect the server. Why? There are 2 reasons:
First, this part belongs to the individual, I am used to and also prefer using IPtables. Because it looks simple.
Second, I can create configuration files for simple and easy-to-configure INPUT and OUTPUT. Instead of complex zones like in Firewalld.
Why control both INPUT and OUTPUT in IPtables?
One thing that most Linux server users are is that they only care about INPUT in the firewall. This is good but not enough.
I have encountered a number of cases, the server has been smuggled out of data through backdoors. If we control both the OUTPUT of the server, it will become more secure.
Configure IPTables firewall for Zimbra mail server
Now, I will go to the main part, which is to configure the IPTables firewall for Zimbra mail server. I will analyze what each part means.
DROP all chain
First, because we control both the INPUT and OUTPUT, we need to set the chains to DROP. This, in my opinion, is necessary. Because my method is all DROP and only ACCEPT the necessary ports.
#############################################
### CHANGE CHAIN'S DEFAULT POLICY TO DROP ###
#############################################
-P INPUT DROP
-P FORWARD DROP
-P OUTPUT DROP
Secure SSH port
There are 2 things I do here, there are actually many things have to do.
I changed the SSH port from port 22 to port 2222, of course you should not leave the SSH port by default.
Next, I only allow SSH from the WAN IP in my office. This restricts outside hackers from accessing the server. Change 192.168.100.10 to your WAN IP.
############################
#####                   ####
##### WHITE LIST IP SSH ####
#####                   ####
############################

### ALLOW SSH FROM OFFICE's IP ###
##################################
-A INPUT -m tcp -p tcp -s 192.168.100.10/32 --dport 2222 -j ACCEPT
-A OUTPUT -m tcp -p tcp -d 192.168.100.10/32 --sport 2222 -j ACCEPT
Against basic DoS attacks
Warning: You need to edit the rate at this section to suit your organization.
This section basically eliminates invalid packets. Protect your server from simple DoS attacks. Don’t understand that it’s 100% guaranteed.
###############################
#####                     #####
##### BLOCK COMMON ATTACK #####
#####                     #####
###############################

### Force SYN packets check ###
### Make sure NEW incoming tcp connections are SYN packets; otherwise we need to drop them ###
##############################################################################################
-A INPUT -p tcp ! --syn -m state --state NEW -j DROP

### Packets with incoming fragments drop them. ###
### This attack result into Linux server panic such data loss ###
#################################################################
-A INPUT -f -j DROP
-A INPUT -p tcp --tcp-flags ALL FIN,URG,PSH -j DROP
-A INPUT -p tcp --tcp-flags ALL ALL -j DROP

### Incoming malformed XMAS packets drop them ###
#################################################
-A INPUT -p tcp --tcp-flags SYN,FIN SYN,FIN -m limit --limit 5/m --limit-burst 7 -j LOG --log-prefix " XMAS Packets "
-A INPUT -p tcp --tcp-flags SYN,FIN SYN,FIN -j DROP

### Drop all NULL packets ###
#############################
-A INPUT -p tcp --tcp-flags ALL NONE -m limit --limit 5/m --limit-burst 7 -j LOG --log-prefix " NULL Packets "
-A INPUT -p tcp --tcp-flags ALL NONE -j DROP
-A INPUT -p tcp --tcp-flags SYN,RST SYN,RST -j DROP

### Drop FIN packet scans ###
#############################
-A INPUT -p tcp --tcp-flags FIN,ACK FIN -m limit --limit 5/m --limit-burst 7 -j LOG --log-prefix " Fin Packets Scan "
-A INPUT -p tcp --tcp-flags FIN,ACK FIN -j DROP
-A INPUT -p tcp --tcp-flags ALL SYN,RST,ACK,FIN,URG -j DROP

### Log and get rid of broadcast / multicast and invalid ###
############################################################
-A INPUT -m pkttype --pkt-type broadcast -j LOG --log-prefix " Broadcast "
-A INPUT -m pkttype --pkt-type broadcast -j DROP

-A INPUT -m pkttype --pkt-type multicast -j LOG --log-prefix " Multicast "
-A INPUT -m pkttype --pkt-type multicast -j DROP

-A INPUT -m state --state INVALID -j LOG --log-prefix " Invalid "
-A INPUT -m state --state INVALID -j DROP

### REJECT CONNECTIONS ABOVE 100 FROM ONE SOURCE IP ###
#######################################################
-A INPUT -p tcp --syn --dport 80 -m connlimit --connlimit-above 100 --connlimit-mask 32 -j REJECT --reject-with tcp-reset
-A INPUT -p tcp --syn --dport 443 -m connlimit --connlimit-above 100 --connlimit-mask 32 -j REJECT --reject-with tcp-reset

### ALLOW 150 NEW CONNECTIONS (PACKETS) PER SECOND ###
######################################################
-A INPUT -m state --state ESTABLISHED,RELATED -m limit --limit 150/second --limit-burst 160 -j ACCEPT
-A OUTPUT -m state --state ESTABLISHED,RELATED -j ACCEPT

### SECURE NUMBER SSH CONNNECTION ###
##############################
-A INPUT -p tcp -m state --state NEW -m tcp --dport 2222 -m recent --set --name DEFAULT --rsource
-A INPUT -p tcp -m state --state NEW -m tcp --dport 2222 -m recent --update --seconds 120 --hitcount 4 --name DEFAULT --rsource -j SSHATTACK
Allow some common services
In this rule section, we allow normal services that the server needs such as Loopback, PING, NTP and DNS to the internet.
##############################
#####                    #####
##### ALLOW COMMON RULES #####
#####                    #####
##############################

### ALLOW UNLIMIT INTERFACE LO ###
##################################
-A INPUT -i lo -j ACCEPT
-A OUTPUT -o lo -j ACCEPT

### ALLOW ICMP PING ###
#######################
-A INPUT -p icmp -j ACCEPT
-A OUTPUT -p icmp -j ACCEPT

### ALLOW NTP TO NTP SERVER ###
###############################
-A OUTPUT -m tcp -p tcp --dport 123 -j ACCEPT
-A OUTPUT -m udp -p udp --dport 123 -j ACCEPT

### ALLOW OUTPUT PORT 53 - DNS ###
##################################
-A OUTPUT -m tcp -p tcp --dport 53 -j ACCEPT
-A OUTPUT -m udp -p udp --dport 53 -j ACCEPT
Open the necessary ports of Zimbra
Although Zimbra’s recommended ports like 80, 110, 143 should only be limited to LAN. However, the requirement is that users can access the webmail even when they are at home, so we also need to open it (we’ll have to protect it later).
Since we run a single server, we will not public port 389 or 636 of LDAP to the internet. At the same time, port 7071 only allows local access (the Zimbra server itself).
#############################
#####                   #####
##### ALLOW PORT ZIMBRA #####
#####                   #####
#############################

### ALLOW PORT SMTP - 25 ###
############################
-A INPUT -m tcp -p tcp --dport 25 -j ACCEPT
-A OUTPUT -m tcp -p tcp --sport 25 -j ACCEPT

-A INPUT -m tcp -p tcp --sport 25 -j ACCEPT
-A OUTPUT -m tcp -p tcp --dport 25 -j ACCEPT

### ALLOW PORT HTTP - 80 ###
############################
-A INPUT -m tcp -p tcp --dport 80 -j ACCEPT
-A OUTPUT -m tcp -p tcp --sport 80 -j ACCEPT

-A INPUT -m tcp -p tcp --sport 80 -j ACCEPT
-A OUTPUT -m tcp -p tcp --dport 80 -j ACCEPT

### ALLOW PORT POP3 - 110 ###
#############################
-A INPUT -m tcp -p tcp --dport 110 -j ACCEPT
-A OUTPUT -m tcp -p tcp --sport 110 -j ACCEPT

-A INPUT -m tcp -p tcp --sport 110 -j ACCEPT
-A OUTPUT -m tcp -p tcp --dport 110 -j ACCEPT

### ALLOW PORT IMAP - 143 ###
#############################
-A INPUT -m tcp -p tcp --dport 143 -j ACCEPT
-A OUTPUT -m tcp -p tcp --sport 143 -j ACCEPT

-A INPUT -m tcp -p tcp --sport 143 -j ACCEPT
-A OUTPUT -m tcp -p tcp --dport 143 -j ACCEPT

### ALLOW PORT HTTPS - 443 ###
##############################
-A INPUT -m tcp -p tcp --dport 443 -j ACCEPT
-A OUTPUT -m tcp -p tcp --sport 443 -j ACCEPT

-A INPUT -m tcp -p tcp --sport 443 -j ACCEPT
-A OUTPUT -m tcp -p tcp --dport 443 -j ACCEPT

### ALLOW PORT SMTPS - 465, 587 ###
###################################
-A INPUT -m tcp -p tcp --match multiport --dports 465,587 -j ACCEPT
-A OUTPUT -m tcp -p tcp --match multiport --sports 465,587 -j ACCEPT

-A INPUT -m tcp -p tcp --match multiport --sports 465,587 -j ACCEPT
-A OUTPUT -m tcp -p tcp --match multiport --dports 465,587 -j ACCEPT

### ALLOW PORT IMAPS - 993 ###
##############################
-A INPUT -m tcp -p tcp --dport 993 -j ACCEPT
-A OUTPUT -m tcp -p tcp --sport 993 -j ACCEPT

-A INPUT -m tcp -p tcp --sport 993 -j ACCEPT
-A OUTPUT -m tcp -p tcp --dport 993 -j ACCEPT

### ALLOW PORT POP3S - 995 ###
##############################
-A INPUT -m tcp -p tcp --dport 995 -j ACCEPT
-A OUTPUT -m tcp -p tcp --sport 995 -j ACCEPT

-A INPUT -m tcp -p tcp --sport 995 -j ACCEPT
-A OUTPUT -m tcp -p tcp --dport 995 -j ACCEPT

### ALLOW PORT ZIMBRA ADMIN  - 7071 ###
#######################################
-A INPUT -m tcp -p tcp -s 127.0.0.1 --dport 7071 -j ACCEPT
-A OUTPUT -m tcp -p tcp -d 127.0.0.1 --sport 7071 -j ACCEPT
At this point, you will ask how to access the admin window without public port 7071. I will use SSH Tunnel to access port 7071. You can use the following command to create a tunnel.
$ ssh -p 2222 -f root@192.168.10.10 -L 7071:192.168.10.10:7071 -N
Change 192.168.10.10 to your mail server’s IP.
And then, type https://localhost:7071 to access the admin window.
Full content file /etc/sysconfig/iptables
Below is the full file content for IPTables. You can copy it and edit it.
*filter

#############################################
### CHANGE CHAIN'S DEFAULT POLICY TO DROP ###
#############################################
-P INPUT DROP
-P FORWARD DROP
-P OUTPUT DROP


###############################
### ADD NEW CHAIN SSHATTACK ###
###############################
:SSHATTACK - [0:0]


############################
#####                   ####
##### WHITE LIST IP SSH ####
#####                   ####
############################

### ALLOW SSH FROM OFFICE's IP ###
##################################
-A INPUT -m tcp -p tcp -s 192.168.100.10/32 --dport 2222 -j ACCEPT
-A OUTPUT -m tcp -p tcp -d 192.168.100.10/32 --sport 2222 -j ACCEPT


###############################
#####                     #####
##### BLOCK COMMON ATTACK #####
#####                     #####
###############################

### Force SYN packets check ###
### Make sure NEW incoming tcp connections are SYN packets; otherwise we need to drop them ###
##############################################################################################
-A INPUT -p tcp ! --syn -m state --state NEW -j DROP

### Packets with incoming fragments drop them. ###
### This attack result into Linux server panic such data loss ###
#################################################################
-A INPUT -f -j DROP
-A INPUT -p tcp --tcp-flags ALL FIN,URG,PSH -j DROP
-A INPUT -p tcp --tcp-flags ALL ALL -j DROP

### Incoming malformed XMAS packets drop them ###
#################################################
-A INPUT -p tcp --tcp-flags SYN,FIN SYN,FIN -m limit --limit 5/m --limit-burst 7 -j LOG --log-prefix " XMAS Packets "
-A INPUT -p tcp --tcp-flags SYN,FIN SYN,FIN -j DROP

### Drop all NULL packets ###
#############################
-A INPUT -p tcp --tcp-flags ALL NONE -m limit --limit 5/m --limit-burst 7 -j LOG --log-prefix " NULL Packets "
-A INPUT -p tcp --tcp-flags ALL NONE -j DROP
-A INPUT -p tcp --tcp-flags SYN,RST SYN,RST -j DROP

### Drop FIN packet scans ###
#############################
-A INPUT -p tcp --tcp-flags FIN,ACK FIN -m limit --limit 5/m --limit-burst 7 -j LOG --log-prefix " Fin Packets Scan "
-A INPUT -p tcp --tcp-flags FIN,ACK FIN -j DROP
-A INPUT -p tcp --tcp-flags ALL SYN,RST,ACK,FIN,URG -j DROP

### Log and get rid of broadcast / multicast and invalid ###
############################################################
-A INPUT -m pkttype --pkt-type broadcast -j LOG --log-prefix " Broadcast "
-A INPUT -m pkttype --pkt-type broadcast -j DROP

-A INPUT -m pkttype --pkt-type multicast -j LOG --log-prefix " Multicast "
-A INPUT -m pkttype --pkt-type multicast -j DROP

-A INPUT -m state --state INVALID -j LOG --log-prefix " Invalid "
-A INPUT -m state --state INVALID -j DROP

### REJECT CONNECTIONS ABOVE 30 FROM ONE SOURCE IP ###
######################################################
-A INPUT -p tcp --syn --dport 80 -m connlimit --connlimit-above 100 --connlimit-mask 32 -j REJECT --reject-with tcp-reset
-A INPUT -p tcp --syn --dport 443 -m connlimit --connlimit-above 100 --connlimit-mask 32 -j REJECT --reject-with tcp-reset

### ALLOW 150 NEW CONNECTIONS (PACKETS) PER SECOND ###
######################################################
-A INPUT -m state --state ESTABLISHED,RELATED -m limit --limit 150/second --limit-burst 160 -j ACCEPT
-A OUTPUT -m state --state ESTABLISHED,RELATED -j ACCEPT

### SECURE NUMBER SSH CONNNECTION ###
##############################
-A INPUT -p tcp -m state --state NEW -m tcp --dport 2222 -m recent --set --name DEFAULT --rsource
-A INPUT -p tcp -m state --state NEW -m tcp --dport 2222 -m recent --update --seconds 120 --hitcount 4 --name DEFAULT --rsource -j SSHATTACK


##############################
#####                    #####
##### ALLOW COMMON RULES #####
#####                    #####
##############################

### ALLOW UNLIMIT INTERFACE LO ###
##################################
-A INPUT -i lo -j ACCEPT
-A OUTPUT -o lo -j ACCEPT

### ALLOW ICMP PING ###
#######################
-A INPUT -p icmp -j ACCEPT
-A OUTPUT -p icmp -j ACCEPT

### ALLOW NTP TO NTP SERVER ###
###############################
-A OUTPUT -m tcp -p tcp --dport 123 -j ACCEPT
-A OUTPUT -m udp -p udp --dport 123 -j ACCEPT

### ALLOW OUTPUT PORT 53 - DNS ###
##################################
-A OUTPUT -m tcp -p tcp --dport 53 -j ACCEPT
-A OUTPUT -m udp -p udp --dport 53 -j ACCEPT


#############################
#####                   #####
##### ALLOW PORT ZIMBRA #####
#####                   #####
#############################

### ALLOW PORT SMTP - 25 ###
############################
-A INPUT -m tcp -p tcp --dport 25 -j ACCEPT
-A OUTPUT -m tcp -p tcp --sport 25 -j ACCEPT

-A INPUT -m tcp -p tcp --sport 25 -j ACCEPT
-A OUTPUT -m tcp -p tcp --dport 25 -j ACCEPT

### ALLOW PORT HTTP - 80 ###
############################
-A INPUT -m tcp -p tcp --dport 80 -j ACCEPT
-A OUTPUT -m tcp -p tcp --sport 80 -j ACCEPT

-A INPUT -m tcp -p tcp --sport 80 -j ACCEPT
-A OUTPUT -m tcp -p tcp --dport 80 -j ACCEPT

### ALLOW PORT POP3 - 110 ###
#############################
-A INPUT -m tcp -p tcp --dport 110 -j ACCEPT
-A OUTPUT -m tcp -p tcp --sport 110 -j ACCEPT

-A INPUT -m tcp -p tcp --sport 110 -j ACCEPT
-A OUTPUT -m tcp -p tcp --dport 110 -j ACCEPT

### ALLOW PORT IMAP - 143 ###
#############################
-A INPUT -m tcp -p tcp --dport 143 -j ACCEPT
-A OUTPUT -m tcp -p tcp --sport 143 -j ACCEPT

-A INPUT -m tcp -p tcp --sport 143 -j ACCEPT
-A OUTPUT -m tcp -p tcp --dport 143 -j ACCEPT

### ALLOW PORT HTTPS - 443 ###
##############################
-A INPUT -m tcp -p tcp --dport 443 -j ACCEPT
-A OUTPUT -m tcp -p tcp --sport 443 -j ACCEPT

-A INPUT -m tcp -p tcp --sport 443 -j ACCEPT
-A OUTPUT -m tcp -p tcp --dport 443 -j ACCEPT

### ALLOW PORT SMTPS - 465, 587 ###
###################################
-A INPUT -m tcp -p tcp --match multiport --dports 465,587 -j ACCEPT
-A OUTPUT -m tcp -p tcp --match multiport --sports 465,587 -j ACCEPT

-A INPUT -m tcp -p tcp --match multiport --sports 465,587 -j ACCEPT
-A OUTPUT -m tcp -p tcp --match multiport --dports 465,587 -j ACCEPT

### ALLOW PORT IMAPS - 993 ###
##############################
-A INPUT -m tcp -p tcp --dport 993 -j ACCEPT
-A OUTPUT -m tcp -p tcp --sport 993 -j ACCEPT

-A INPUT -m tcp -p tcp --sport 993 -j ACCEPT
-A OUTPUT -m tcp -p tcp --dport 993 -j ACCEPT

### ALLOW PORT POP3S - 995 ###
##############################
-A INPUT -m tcp -p tcp --dport 995 -j ACCEPT
-A OUTPUT -m tcp -p tcp --sport 995 -j ACCEPT

-A INPUT -m tcp -p tcp --sport 995 -j ACCEPT
-A OUTPUT -m tcp -p tcp --dport 995 -j ACCEPT

### ALLOW PORT ZIMBRA ADMIN  - 7071 ###
#######################################
-A INPUT -m tcp -p tcp -s 127.0.0.1 --dport 7071 -j ACCEPT
-A OUTPUT -m tcp -p tcp -d 127.0.0.1 --sport 7071 -j ACCEPT


###########################
#####                 #####
##### DROP OTHER PORT #####
#####                 #####
###########################

### DROP ALL ANOTHER SSH CONNECTION ###
#######################################
-A INPUT -m tcp -p tcp --dport 22 -j DROP

### DEFAULT REJECT RULE ###
###########################
-A INPUT -j REJECT --reject-with icmp-host-prohibited
-A FORWARD -j REJECT --reject-with icmp-host-prohibited

### DROP AND WRITE LOG WITH SSHATTACK CHAIN ###
###############################################
-A SSHATTACK -j LOG --log-prefix "Possible SSH attack! " --log-level 7
-A SSHATTACK -j DROP

COMMIT
Conclusion
Firewall is the first step to make your server more secure. Pay attention and do it carefully. In an environment full of threats, adding a safe operation is not excessive.
«« Configure reverse DNS for Zimbra and check Black ListInstall Zimbra zimlets failed during installation »»


Thanks comrad, this was very helpfull to me…
yep, glad to hear that.
A bit late to the party, and thanks so much for this article. I do, however, have one question if you’ll indulge me;
SINCE your default policy is — quite rightly — DROP (on all chains) then what is the rationale behind having “DROP” firewall rules?