SystemMen - Configure reverse DNS for Zimbra mail server and check Black List
In this article, I will show you how to configure DNS reserce for Zimbra mail server and check the black list.
Why do we need reverse DNS?
At the beginning of this serie, you have configured the DNS record to resolve the mail domain mail.yourdomain.com to the IP of the Zimbra server.
However, that may not be enough. Some companies around the world like AOL, they will reject your email if you don’t have a reverse DNS record.
Configure reverse DNS for Zimbra mail server
What is Reverse DNS?
Take a look at the image below, and you’ll know what the reverse dns record is.
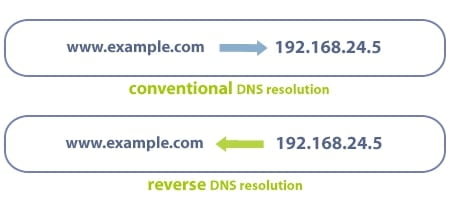
The rDNS (reverse dns) record allows IP resolution to be a domain name, which helps confirm your Zimbra mail server correctly.
Where do we need to configure rDNS?
- You need to configure rDNS in the provider public DNS. I’m sure you have to contact and ask them to do this for you.
- In Zimbra mail server, you need to change the SMTP Banner to match the rDNS record.
In this article, I will show you how to change the SMTP Banner in the Zimbra server.
Change SMTP Banner in Zimbra server
Zimbra has instructions for this at the following link. Scroll down to the bottom of the page to read more about it.
For Zimbra 8.8.12, you do the following.
Switch to user Zimbra.
[root@mail home]# su zimbra
Then type the following command to edit the SMTP Banner.
[zimbra@mail home]$ zmprov ms `zmhostname` zimbraMtaSmtpdBanner mail.yourdomain.com
Restart Zimbra service.
[zimbra@mail home]$ zmcontrol restart
Host mail.yourdomain.com
	Stopping zmconfigd…Done.
	Stopping imapd…Done.
	Stopping zimlet webapp…Done.
	Stopping zimbraAdmin webapp…Done.
	Stopping zimbra webapp…Done.
	Stopping service webapp…Done.
	Stopping stats…Done.
	Stopping mta…Done.
	Stopping spell…Done.
	Stopping snmp…Done.
	Stopping cbpolicyd…Done.
	Stopping archiving…Done.
	Stopping opendkim…Done.
	Stopping amavis…Done.
	Stopping antivirus…Done.
	Stopping antispam…Done.
	Stopping proxy…Done.
	Stopping memcached…Done.
	Stopping mailbox…Done.
	Stopping logger…Done.
	Stopping dnscache…Done.
	Stopping ldap…Done.
Host mail.yourdomain.com
	Starting ldap…Done.
	Starting zmconfigd…Done.
	Starting logger…Done.
	Starting mailbox…Done.
	Starting memcached…Done.
	Starting proxy…Done.
	Starting amavis…Done.
	Starting antispam…Done.
	Starting antivirus…Done.
	Starting opendkim…Done.
	Starting snmp…Done.
	Starting spell…Done.
	Starting mta…Done.
	Starting stats…Done.
	Starting service webapp…Done.
	Starting zimbra webapp…Done.
	Starting zimbraAdmin webapp…Done.
	Starting zimlet webapp…Done.
	Starting imapd…Done.
Then check Zimbra status to make sure it running.
[zimbra@mail home]$ zmcontrol status
Host mail.yourdomain.com
	amavis                  Running
	antispam                Running
	antivirus               Running
	imapd                   Running
	ldap                    Running
	logger                  Running
	mailbox                 Running
	memcached               Running
	mta                     Running
	opendkim                Running
	proxy                   Running
	service webapp          Running
	snmp                    Running
	spell                   Running
	stats                   Running
	zimbra webapp           Running
	zimbraAdmin webapp      Running
	zimlet webapp           Running
	zmconfigd               Running
How to check if SMTP Banner working?
Once set up, you need to check if it is working.
You type the command as below.
$ telnet mail.yourdomain.com 25
If the SMTP Banner is active, you will receive a 220 mail.yourdomain.com code.
$ telnet mail.yourdomain.com 25
Trying 192.168.10.10…
Connected to mail.yourdomain.com.
Escape character is '^]'.
220-mail.yourdomain.com
220 mail.yourdomain.com
Check if your mail server is marked with a black list
Until now, you have fully set up all the necessary things for your mail server to work.
However, there is one last thing. That is to check if your Zimbra mail server is being blacklisted.
If your IP server mail is marked with a black list, it will not be able to send mail outside the internet, other systems will reject it.
To check the black list, click on the following link and enter your server mail IP.
The result should be like the image below.
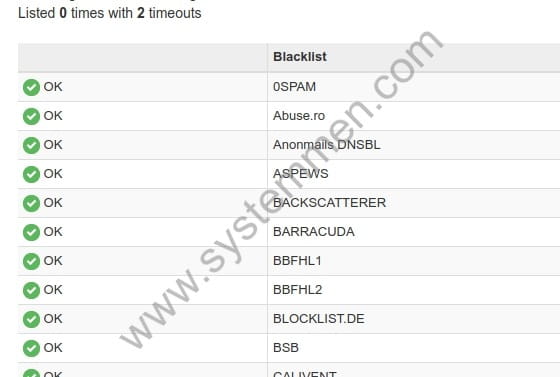
If you have a list in the black list, you need to find a new and clean IP from the provider. Or you need to contact each organization like Barracuda… to ask them to remove the black list for your IP/server mail.
Conclusion
Through this article, you have configured reverse DNS for your mail server. You already know how to set up SMTP Banner and check it works.
And finally, you know how to check if your mail server is being marked black list. This should be done regularly to make sure your server can send mail to the internet.
In this article, I also ended the series to guide installing Zimbra mail server 8.8.12 for beginners. Now you can create an account and start sending mail.
«« Configure DMARC for Zimbra mail server 8.8.12Configure IPTables firewall for Zimbra mail server »»

