SystemMen - How to install CentminMod with PHP 7.3 in CentOS 7? This article will guide you to do that. Let’s start.
CentminMod and PHP 7.3
At the time of this article, CentminMod has released the 123.09beta01 beta version.
This version supports many things to make your hosting more powerful, including:
- Nginx 1.17.2
- PHP 7.3.7
- MariaDB 10.3.16
- Let’s Encrypt
Install CentminMod with PHP 7.3 in CentOS 7

The note before installing CentminMod
Now we will start installing it. Have some notes with you before installing CentminMod.
- You need to turn off SELinux on your vps. If you use vps from providers like Digital Ocean or Linode or Vultr, they made it available to you.
- VPS should be 1 GB or more RAM.
Most of you only need to care about the two things above, but the other detailed notes, you can see here.
Install CentminMod
Now ssh into your vps.
Then, type this command to download CentminMod script and install it. This command will help you install the latest software packages and especially with PHP 7.3 — this makes your website run much faster.
yum -y update; curl -O https://centminmod.com/betainstaller73.sh && chmod 0700 betainstaller73.sh && bash betainstaller73.sh
Depending on your vps, such as hard drive speed, network speed, vps location, the installation time may take 15 — 30 minutes.
The installation will take place completely automatically, just wait until it shows the finish message as below.
--------------------------------------------------------
*************************************************
* Centmin Mod install completed....
*************************************************

*************************************************
*  Setup memcached_*.php admin page …
*************************************************

Setup Memcached Server Admin Login Details for /usr/local/nginx/html/memcache_5a8767dd2ec42040.php
current memcached username: memcacheuser
current memcached password: memcachepass
*************************************************
Memcached Server Admin Login File: /usr/local/nginx/html/memcache_5a8767dd2ec42040.php
Memcached Server Admin Login: test.local/memcache_5a8767dd2ec42040.php
new memcached username: memadminTfkIXY8B55
new memcached password: v9efwpIzZmqTYjqRkMblwYz5PO
*************************************************
*************************************************
* memcache_5a8767dd2ec42040.php admin page installed
*************************************************


*************************************************
PHP Info Login File: /usr/local/nginx/html/c79a5dbd_phpi.php
PHP Info Login: test.local/c79a5dbd_phpi.php
PHP Info Login username: phpiadminn1sK6FsGHUjsNM
PHP Info Login password: wjwKFJqkELZswrZTKOe09yFJ1G
*************************************************

*************************************************
* Zend Opcache Stats Password / URL
*************************************************

-------------------------------------------------------
File Location: /usr/local/nginx/html/ee6fb54a63d1cf8f_opcache.php
Password protected test.local/ee6fb54a63d1cf8f_opcache.php
-------------------------------------------------------
Username: opadminaiZsB43iquaFQ
Password: POaxRKIZZ99BDCm95LrqwpYFYUug
-------------------------------------------------------

*************************************************
* MariaDB Security Setup
*************************************************

-------------------------------------------------------
MySQL root user password set
MySQL root user added to /root/.my.cnf
-------------------------------------------------------
MySQL root password: jmkRuoiBugGviJjCGVJnOSdkDuu
-------------------------------------------------------
*************************************************
* MariaDB Security Setup Completed
*************************************************

--------------------------------------------------------
Please bookmark:
--------------------------------------------------------
###############################################################
* Getting Started Guide - http://centminmod.com/getstarted.html
* Find the latest Centmin Mod version - http://centminmod.com
* Centmin Mod FAQ - http://centminmod.com/faq.html
* Change Log - http://centminmod.com/changelog.html
* Google+ Page latest news http://centminmod.com/gpage
* Community Forums https://community.centminmod.com (signup)
###############################################################
# Cheap VPS Hosting at Digitalocean
# https://www.digitalocean.com/?refcode=c1cb367108e8
###############################################################

Created command shortcuts:
* type cmdir to change to Centmin Mod install directory
  at /usr/local/src/centminmod
* type centmin call and run centmin.sh
  at /usr/local/src/centminmod/centmin.sh

---------------------------------------------------------------------------
Total Curl Installer YUM or DNF Time: 176.0743 seconds
Total YUM Time: 18.189755025 seconds
Total YUM or DNF + Source Download Time: 55.9159
Total Nginx First Time Install Time: 663.3400
Total PHP First Time Install Time: 1086.8856
Download From Github Time: 2.4619
Total Time Other eg. source compiles: 527.5392
Total Centmin Mod Install Time: 2333.6807
---------------------------------------------------------------------------
Total Install Time (curl yum + cm install + zip download): 2512.2169 seconds
---------------------------------------------------------------------------
1 Virtual CPU 714389bda930
1 2399.996
---------------------------------------------------------------------------

You have new mail in /var/spool/mail/root
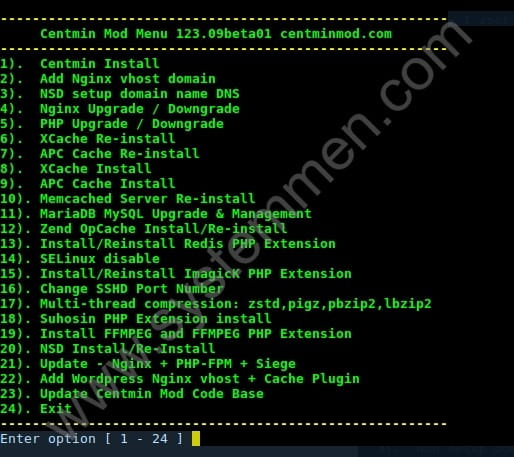
After the installation is complete, you can type centmin to open the CentminMod management menu and perform the operations you want.
Conclusion
In the content of this article, I only stop by instructing you to install CentminMod only. In the next article, I will show you how to use it.
«« How to export a list of accounts by domain in ZimbraHow to use Let’s Encrypt SSL in CentminMod »»


