SystemMen - snx: error while loading shared libraries: libX11.so.6: cannot open shared object file: No such file or directory.
This is an error I encountered when installing Check Point VPN client on Linux Mint 19. This article, I will show you how to fix this error.
First, I have successfully installed Check Point VPN client on Linux Mint 18 and have no problems.
Recommended Reading: How to install Check Point VPN client in Linux
The error “/usr/bin/cshell/launcher: not found”
When I did the same on Mint 19, when I installed cshell, I encountered an error like the following.
root@linux:~/Desktop# bash cshell_install.sh
Start Check Point Mobile Access Portal Agent installation
Extracting Mobile Access Portal Agent… Done
Installing Mobile Access Portal Agent… Done
Installing certificate… Done
Starting Mobile Access Portal Agent… /bin/sh: 1: /usr/bin/cshell/launcher: not found
I listed the cshell folder and found the launcher file in it, which is absurd.
root@linux:~/Desktop# ls -al /usr/bin/cshell/
total 1652
drwxr-xr-x 4 danie danie    4096 Aug 13 22:05 .
drwxr-xr-x 3 root  root    65536 Aug  9 20:09 ..
drwxr-xr-x 2 danie danie    4096 Aug 13 22:05 cert
-rwxr-xr-x 1 danie danie 1588827 May 21  2018 CShell.jar
-rw-r--r-- 1 danie danie    8230 May 21  2018 cshell_uninstall.sh
-rwx--x--x 1 danie danie    7415 May 21  2018 launcher
drwxr-xr-x 2 danie danie    4096 Aug 13 22:05 tmp
I think that the launcher file is an executable file and probably calls a dependency file and it can’t be found.
For the time being, I don’t know which file is missing.
The error “snx: error while loading shared libraries: libX11.so.6”

Next, I installed the snx package and encountered the following error.
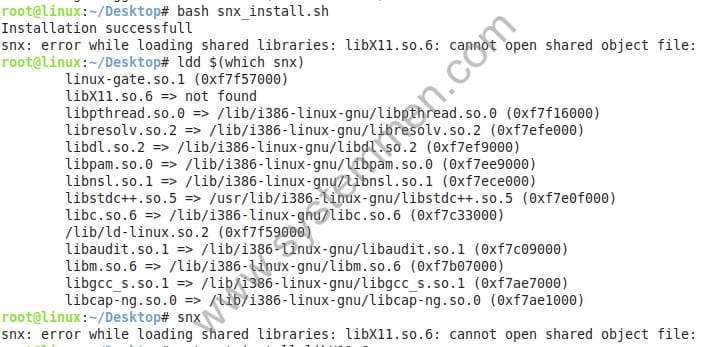
root@linux:~/Desktop# bash snx_install.sh
Installation successfull
snx: error while loading shared libraries: libX11.so.6: cannot open shared object file: No such file or directory
At this point, I know I have a missing file.
To be sure, I use the following command to check if snx is missing any files. And just like the error message, it is missing libX11.so.6.
root@linux:~/Desktop# ldd $(which snx)
	linux-gate.so.1 (0xf7f57000)
	libX11.so.6 => not found
	libpthread.so.0 => /lib/i386-linux-gnu/libpthread.so.0 (0xf7f16000)
	libresolv.so.2 => /lib/i386-linux-gnu/libresolv.so.2 (0xf7efe000)
	libdl.so.2 => /lib/i386-linux-gnu/libdl.so.2 (0xf7ef9000)
	libpam.so.0 => /lib/i386-linux-gnu/libpam.so.0 (0xf7ee9000)
	libnsl.so.1 => /lib/i386-linux-gnu/libnsl.so.1 (0xf7ece000)
	libstdc++.so.5 => /usr/lib/i386-linux-gnu/libstdc++.so.5 (0xf7e0f000)
	libc.so.6 => /lib/i386-linux-gnu/libc.so.6 (0xf7c33000)
	/lib/ld-linux.so.2 (0xf7f59000)
	libaudit.so.1 => /lib/i386-linux-gnu/libaudit.so.1 (0xf7c09000)
	libm.so.6 => /lib/i386-linux-gnu/libm.so.6 (0xf7b07000)
	libgcc_s.so.1 => /lib/i386-linux-gnu/libgcc_s.so.1 (0xf7ae7000)
	libcap-ng.so.0 => /lib/i386-linux-gnu/libcap-ng.so.0 (0xf7ae1000)
I checked my computer has installed this package or not and it was amazing that it was already installed.
root@linux:~/Desktop# apt-get install libx11-6
Reading package lists… Done
Building dependency tree
Reading state information… Done
libx11-6 is already the newest version (2:1.6.4-3ubuntu0.2).
But looking back at the installation steps, I realized that Check Point VPN client on Linux runs 32 bit. And I just checked the 64 bit package, this is probably my omission.
Fix “snx: error while loading shared libraries: libX11.so.6”
And here, I try to solve the problem by installing the package libx11-6:i386 with the following command.
# apt-get install libx11-6:i386 -y
After the installation is complete, I try to run the snx command and it’s great, it’s out of error.
root@linux:~/Desktop# snx
failed to open file: /root/.snxrc
Valid attributes are:
   - server          SNX server to connet to
   - sslport         The SNX SSL port (if not default)
   - username        the user name
   - certificate     certificate file to use
   - calist          directory containing CA files
   - reauth          enable automatic reauthentication. Valid values { yes, no }
   - debug           enable debug output. Valid values { yes, 1-5 }
   - cipher          encryption algorithm to use. Valid values { RC4 / 3DES }
   - proxy_name      proxy hostname
   - proxy_port      proxy port
   - proxy_user      username for proxy authentication
Next, I ran the cshell launcher file and it was great, it worked without any errors.
root@linux:~/Desktop# /usr/bin/cshell/launcher
LAUNCHER> Starting CShell…
LAUNCHER> CShell Started
Conclusion
With each step of the tutorial in this article, I hope you can fix the error with Check Point VPN client on your Linux machine.
«« Git clone repository to your computerAWS extend GPT root partition on Linux »»


Your posts on snx vpn helped me a lot, thanks