SystemMen - AWS extend GPT root partition on Linux. Today I will show you how to extend the Linux root partition with the GPT table.
My case
On AWS, I use an AMI RedHat 7 to serve a software. This AMI version assigns an NVME disk for the root partition (/) and it does not allow me to edit the size of this disk.

The only thing that helped me to increase the size of this NVME disk when creating the server was to choose the size of EC2 larger. And in my problem, that’s impossible, the software is installed and working.
The main problem I encountered was that the root (/) partition was full and my program started to stop working.
Increase EBS volume size
When the server’s NVME disk was full, I proceeded to increase its volume size. This you do in the AWS Console and it’s quite simple.
Note: you should make a snapshot of the server’s EBS root volume before increasing its size.
You just need to wait for the volume optimization process to succeed.

Recommendations
If possible, extend the root partition before installing the software.
In my case, I was able to extend the root partition to the active server. However, the program is not working properly and it has an error, I still have not figured out what it is.
When you reboot the server, you may encounter the following error.
[   10.890455] XFS (nvme0n1p2): metadata I/O error: block 0x3 ("xfs_trans_read_buf_map") error 74 numblks 1
[   10.890458] XFS (nvme0n1p2): xfs_do_force_shutdown(0x8) called from line 236 of file fs/xfs/libxfs/xfs_defer.c.  Return address = 0xffffffffc024d9cb
[   10.892030] XFS (nvme0n1p2): Corruption of in-memory data detected.  Shutting down filesystem
[   10.892031] XFS (nvme0n1p2): Please umount the filesystem and rectify the problem(s)
[  141.615949] random: crng init done
With EC2 server, you will almost have to recreate a new instance. If you are using a server in a different environment, you can try running the Live CD and entering Rescue mode. You may to try this link.
Step by step to extend GPT root partition on Linux

Check initial partition capacity.
With df command.
[root@ip-172-16-100-10 ~]# df -Th
Filesystem     Type      Size  Used Avail Use% Mounted on
/dev/nvme0n1p2 xfs       300G  1,5G  299G   1% /
devtmpfs       devtmpfs   31G     0   31G   0% /dev
tmpfs          tmpfs      31G     0   31G   0% /dev/shm
tmpfs          tmpfs      31G  8,5M   31G   1% /run
tmpfs          tmpfs      31G     0   31G   0% /sys/fs/cgroup
tmpfs          tmpfs     6,2G     0  6,2G   0% /run/user/1000
With lsblk command.
[root@ip-172-16-100-10 ~]# lsblk
NAME        MAJ:MIN RM   SIZE RO TYPE MOUNTPOINT
nvme0n1     259:1    0   600G  0 disk
├─nvme0n1p1 259:2    0     1M  0 part
└─nvme0n1p2 259:3    0   300G  0 part /
nvme1n1     259:0    0 279,4G  0 disk
You can see in the df and lsblk commands, the disk has a capacity of 600 GB but the root partition has only 300 GB.
Check the GPT table. And notice the Partition Table is being gpt.
[root@ip-172-16-100-10 ~]# parted -l
Model: NVMe Device (nvme)
Disk /dev/nvme0n1: 644GB
Sector size (logical/physical): 512B/512B
Partition Table: gpt
Disk Flags:

Number  Start   End     Size    File system  Name  Flags
 1      1049kB  2097kB  1049kB                     bios_grub
 2      2097kB  644GB   644GB   xfs
I have consulted this post. And here is the extend process.
Step 1: move the partition header to the end of the disk, name of disk is nvme0n1.
[root@ip-172-16-100-10 ~]# sgdisk -e /dev/nvme0n1
Warning: The kernel is still using the old partition table.
The new table will be used at the next reboot.
The operation has completed successfully.
Step 2: delete partition number 2 (nvme0n1p2).
[root@ip-172-16-100-10 ~]# sgdisk -d 2 /dev/nvme0n1
Warning: The kernel is still using the old partition table.
The new table will be used at the next reboot.
The operation has completed successfully.
And step 3: Recreate partition number 2.
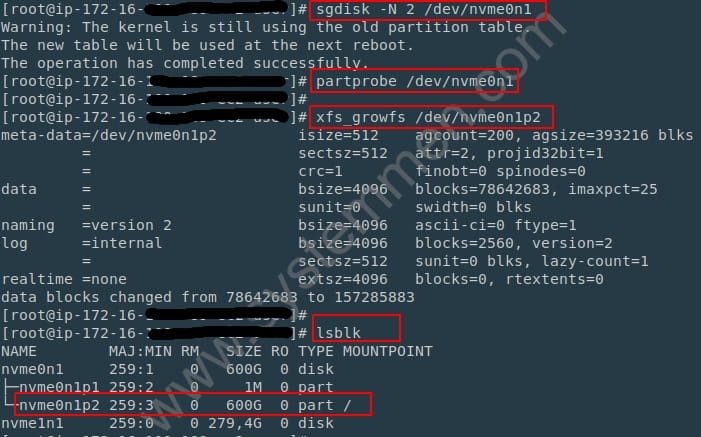
[root@ip-172-16-100-10 ~]# sgdisk -N 2 /dev/nvme0n1
Warning: The kernel is still using the old partition table.
The new table will be used at the next reboot.
The operation has completed successfully.
Step 4: run partprobe so the partition is registered with the new size.
[root@ip-172-16-100-10 ~]# partprobe /dev/nvme0n1
And finally, you can grow your filesystem with below command.
[root@ip-172-16-100-10 ~]# resize2fs /dev/nvme0n1p2
If your server uses XFS for the root partition just like me, run the following command.
Step 5: grow your xfs filesystem.
[root@ip-172-16-100-10 ~]# xfs_growfs /dev/nvme0n1p2
meta-data=/dev/nvme0n1p2         isize=512    agcount=200, agsize=393216 blks
         =                       sectsz=512   attr=2, projid32bit=1
         =                       crc=1        finobt=0 spinodes=0
data     =                       bsize=4096   blocks=78642683, imaxpct=25
         =                       sunit=0      swidth=0 blks
naming   =version 2              bsize=4096   ascii-ci=0 ftype=1
log      =internal               bsize=4096   blocks=2560, version=2
         =                       sectsz=512   sunit=0 blks, lazy-count=1
realtime =none                   extsz=4096   blocks=0, rtextents=0
data blocks changed from 78642683 to 157285883
And everything done.
Conclusion
And now, you can check your partition again.
[root@ip-172-16-100-10 ~]# df -Th
Filesystem     Type      Size  Used Avail Use% Mounted on
/dev/nvme0n1p2 xfs       600G  1,5G  599G   1% /
devtmpfs       devtmpfs   31G     0   31G   0% /dev
tmpfs          tmpfs      31G     0   31G   0% /dev/shm
tmpfs          tmpfs      31G  8,5M   31G   1% /run
tmpfs          tmpfs      31G     0   31G   0% /sys/fs/cgroup
tmpfs          tmpfs     6,2G     0  6,2G   0% /run/user/1000
tmpfs          tmpfs     6,2G     0  6,2G   0% /run/user/0
You can see the root partition has increased to 600 GB successfully. Now, you can reboot the server to make sure the filesystem is working properly. Hope this article is helpful for you.
«« snx: error while loading shared libraries: libX11.so.6How to install mkdocs in Ubuntu server 18.04 »»

