SystemMen - How to extend Linux LVM partition in AWS? Today I will show you how to do that.
This is an accidental situation, a person asked me for help. He uses a CentOS server on AWS and it is full of root partition while disk space is still available. He wants me to help extend the root partition and this article will share what I did.
Determine the partition information
First, you need to determine where the root partition is. This is very important.
This server has only one disk, so I just need to care about which partition it is located in. You have the following command to view information.
[root@centos ~]# lsblk
NAME            MAJ:MIN RM  SIZE RO TYPE MOUNTPOINT
xvda            202:0    0   20G  0 disk
├─xvda1         202:1    0  500M  0 part /boot
└─xvda2         202:2    0    8G  0 part
  ├─centos-root 253:0    0  6,7G  0 lvm  /
  └─centos-swap 253:1    0  820M  0 lvm  [SWAP]
You can see, we have a disk that is xvda, the root (/) partition is centos-root and it is in xvda2.
Next, let’s see how much the root partition is used.
[root@centos ~]# df -Th
Filesystem              Type      Size  Used Avail Use% Mounted on
/dev/mapper/centos-root xfs       6,7G  6,7G   95M  99% /
devtmpfs                devtmpfs  907M     0  907M   0% /dev
tmpfs                   tmpfs     919M     0  919M   0% /dev/shm
tmpfs                   tmpfs     919M  8,5M  910M   1% /run
tmpfs                   tmpfs     919M     0  919M   0% /sys/fs/cgroup
/dev/xvda1              xfs       497M  264M  234M  53% /boot
tmpfs                   tmpfs     184M     0  184M   0% /run/user/1000
As you can see, the root partition is 99% used with a capacity of 6.7 GB.
How to extend Linux LVM partition in AWS?
Now that we see the problem, the 20 GB server but the root partition is only 6.7 GB and it is full. What will we do now?

Growpart tool
Growpart is the tool we will use. It is used to extend a partition in a partition table to fill available space.
You type the below command to install growpart.
# yum install cloud-utils-growpart -y
Use growpart to expand the partition
As a result of the lsblk command, you can see that the xvda2 partition is only 8GB in size, so ~12 GB is available.
First we will use growpart to extend partition xvda2 to full disk.
Command syntax, we select the disk and partition number. Here we have two partitions, xvda1 and xvda2, so we choose the partition number of 2.
[root@centos ~]# growpart /dev/xvda 2
You retype the lsblk command to review its capacity.
[root@centos ~]# lsblk
NAME            MAJ:MIN RM  SIZE RO TYPE MOUNTPOINT
xvda            202:0    0   20G  0 disk
├─xvda1         202:1    0  500M  0 part /boot
└─xvda2         202:2    0 19,5G  0 part
  ├─centos-root 253:0    0  6,7G  0 lvm  /
  └─centos-swap 253:1    0  820M  0 lvm  [SWAP]
You see the size increase from 8 GB to 19.5 GB.
At this step, you need to reboot the server.
[root@centos ~]# reboot
Extend LVM parition
You can see that the centos-root partition is of LVM type. So, we need to use LVM technique here.
First, we need to extend physical volume. The physical volume here is /dev/xvda2. It contains centos-root.
[root@centos ~]# pvresize /dev/xvda2
  Physical volume "/dev/xvda2" changed
  1 physical volume(s) resized or updated / 0 physical volume(s) not resized
Next, we will extend the size of the logical volume. It is /dev/mapper/centos-root. If you look at the result of the df -Th command at the top of the article, you will see the Filesystem column of the root partition (/) is it.
[root@ centos ~]# lvextend -l +100%FREE /dev/mapper/centos-root
  Size of logical volume centos/root changed from <6,71 GiB (1717 extents) to <18,71 GiB (4789 extents).
  Logical volume centos/root successfully resized.
And finally, we will extend FS for the logical volume. Some articles mentioned using the resize2fs command, but it does not work in this case.
[root@centos ~]# resize2fs /dev/mapper/centos-root
resize2fs 1.42.9 (28-Dec-2013)
resize2fs: Bad magic number in super-block while trying to open /dev/mapper/centos-root
Couldn't find valid filesystem superblock.
Therefore, I use another command and it succeeds.
[root@centos ~]# xfs_growfs /dev/centos/root
meta-data=/dev/mapper/centos-root isize=256    agcount=5, agsize=436992 blks
         =                       sectsz=512   attr=2, projid32bit=1
         =                       crc=0        finobt=0 spinodes=0
data     =                       bsize=4096   blocks=1758208, imaxpct=25
         =                       sunit=0      swidth=0 blks
naming   =version 2              bsize=4096   ascii-ci=0 ftype=0
log      =internal               bsize=4096   blocks=2560, version=2
         =                       sectsz=512   sunit=0 blks, lazy-count=1
realtime =none                   extsz=4096   blocks=0, rtextents=0
data blocks changed from 1758208 to 4903936
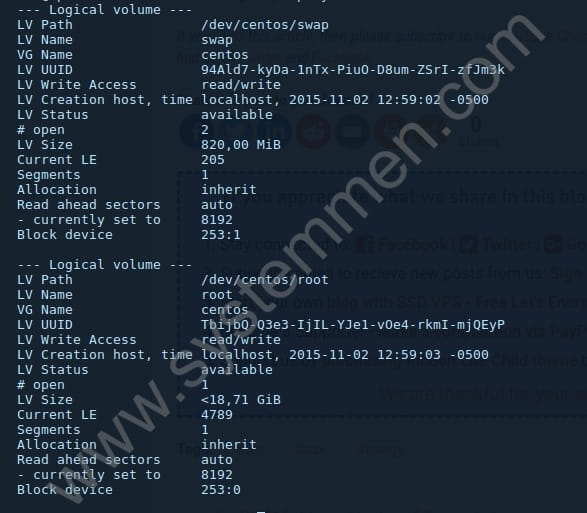
You may be wondering where do I get this /dev/centos/root path? Very simply, type lvdisplay to display logical volume information.
[root@centos ~]# lvdisplay
  --- Logical volume ---
  LV Path                /dev/centos/swap
  LV Name                swap
  VG Name                centos
  LV UUID                94Ald7-kyDa-1nTx-PiuO-D8um-ZSrI-zfJm3k
  LV Write Access        read/write
  LV Creation host, time localhost, 2015-11-02 12:59:02 -0500
  LV Status              available
  # open                 2
  LV Size                820,00 MiB
  Current LE             205
  Segments               1
  Allocation             inherit
  Read ahead sectors     auto
  - currently set to     8192
  Block device           253:1

  --- Logical volume ---
  LV Path                /dev/centos/root
  LV Name                root
  VG Name                centos
  LV UUID                TbijbQ-Q3e3-IjIL-YJe1-vOe4-rkmI-mjQEyP
  LV Write Access        read/write
  LV Creation host, time localhost, 2015-11-02 12:59:03 -0500
  LV Status              available
  # open                 1
  LV Size                <18,71 GiB
  Current LE             4789
  Segments               1
  Allocation             inherit
  Read ahead sectors     auto
  - currently set to     8192
  Block device           253:0
You see the LV Name section with the root name. You will see its corresponding LV Path section.
Now we will check the final result, whether the root partition has been expended or not.
[root@centos ~]# df -Th
Filesystem              Type      Size  Used Avail Use% Mounted on
/dev/mapper/centos-root xfs        19G  6,7G   13G  36% /
devtmpfs                devtmpfs  907M     0  907M   0% /dev
tmpfs                   tmpfs     919M     0  919M   0% /dev/shm
tmpfs                   tmpfs     919M  8,5M  910M   1% /run
tmpfs                   tmpfs     919M     0  919M   0% /sys/fs/cgroup
/dev/xvda1              xfs       497M  264M  234M  53% /boot
tmpfs                   tmpfs     184M     0  184M   0% /run/user/1000
Conclusion
And you see, it succeeded. The root partition size has increased to 19 GB and is currently available for 13 GB. Expanding the size of this partition ensures your data is not lost, but if possible, back up the data before proceeding. Hope this is a useful article for you.
«« Fix DKIM field must be base64 encodedHow to install Check Point VPN client in Linux »»


Thanks, most of article defines simple volume extension, not a LVM as well.
Helpful post.