SystemMen - In this article, I will give you some tips for preparing resources for nginx proxy servers. I will outline some of the goals why I prepared such resources.
Recommended server resources
System resources for a medium-sized company, according to my experience. You can adjust according to your company scale.
- OS: CentOS 7.x 64 bit. The current version is 7.5.
- RAM: 8 GB or bigger.
- HDD: 100 GB for OS. Partitions as below:
- /boot: 500 MB.
- swap: 8 GB or 16 GB.
- /: 30 GB.
- /home: 10 GB.
- /var/log: 30 GB.
- /tmp: the rest of the disk.
- vCPU: 4 or 8 CPU.
Sync nginx configuration between servers
This is the main reason that I have to dedicate an article for resource preparation. And you see, when you have multiple nginx proxy servers and the task of syncing nginx configuration files between servers is something you should be concerned about.
There are many ways to do that, if you use a physical server, you can connect directly to devices like SAN, NAS. Or you can set up a share storage cluster and connect nginx proxy servers to storage via iSCSI.
This is for doing so, so you can write-reads data simultaneously between servers on the same shared drive (shared storage area). As such, the nginx configuration files will be identical, you just need to edit on a server only.
Share disk solution on VMware
VMware virtualization is a solution that many companies nowadays use. This part, I will guide people to map a raw LUN from the SAN to the virtual machine and share that disk with other virtual machines.
Step 1: Create a LUN.
You create a LUN on the SAN (or similar devices) of about 10G (or smaller if you want), export it to the physical hosts that you intend to create virtual machines on.
Step 2: Create the first virtual machine.
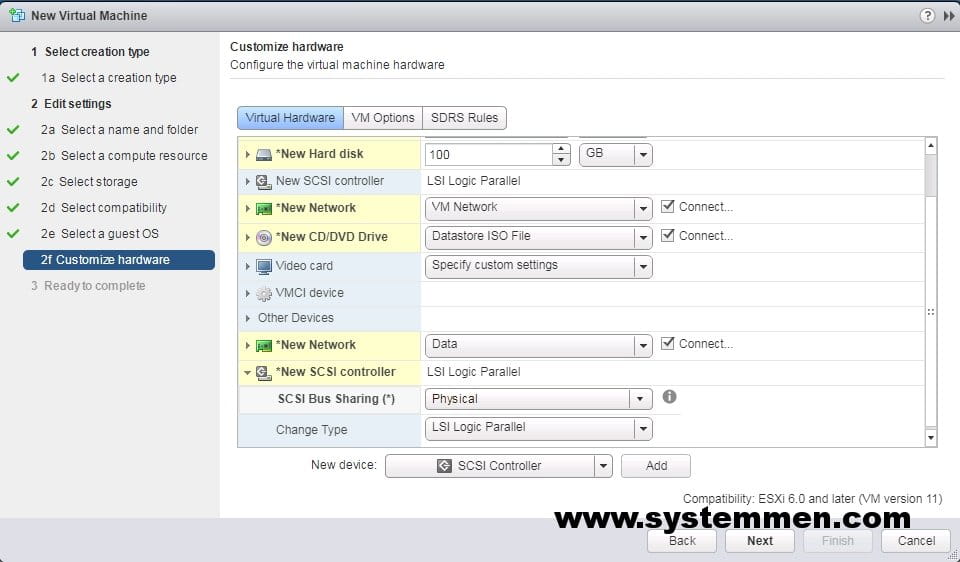
Create a virtual machine similar to the image below. There is a step to take in this step: Create a new SCSI Controller, at the SCSI Bus Sharing section, select Physical.
Step 3: Create a new RDM disk.
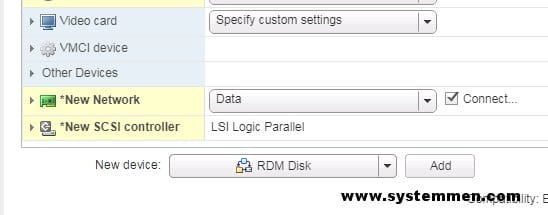
After you created a new SCSI Controller, you have to create a new RDM Disk. This disk will use to map the LUN that was created at step 1. At New device, choose RDM Disk and click Add.
Step 4: Map RDM Disk to the LUN.
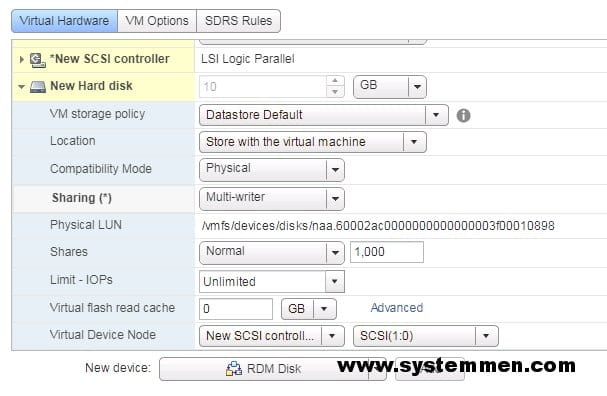
In the example below, I will map the LUN with ID 0.

Step 5: Finish settings of the first virtual machine.
Set up the RDM disk as the image below. After that, you can click Finish and install OS for the first virtual machine.
There are two points in this step:
Sharingsection selectMulti-writer.- The
Virtual Device Nodeselects the New SCSI Controller (created in step 2) and selectsSCSI(1: 0).
Step 6: Create a second virtual machine that has the same configuration as the first virtual machine.
There are two points to note in the second virtual machine:
- We also created a SCSI Controller and chose the Physical mode as the first virtual machine.
- In the second virtual machine, we do not create a new RDM drive that creates an Existing Hard Disk. In the Disk File you find the file .vmdk is stored on the first virtual machine.
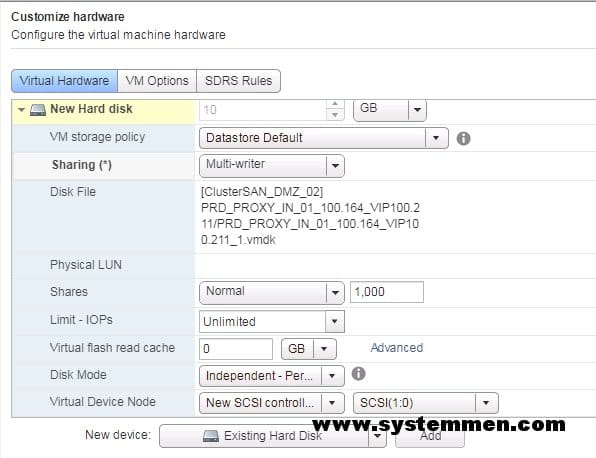
After that, you can install OS for second virtual machine as the first one. Now, at both virtual machine will see the share disk.
Conclusion
In theory, now both virtual machines can write data to that shared disk. However, read — write data at the same time will be more complex than you think. It can be conflicting data, overlapping files or other problems. Therefore, we will need to install a file system on the shared disk to solve the problem.
This article ends with the completion of two Nginx proxy virtual machines with a shared drive mapped to the LUN on the SAN. In the next article, I will show you how to install the OCFS2 file system so that you can solve the problem of reading — writing data concurrently.
«« Nginx reverse proxy multi master architectureInstall Ansible AWX on CentOS 7 »»

