SystemMen - This article will show you how to install MariaDB 10.3 in CentOS 6. Version 10.3 is the latest MariaDB version at this time.
Configure server requirements
The following is the recommended configuration to use the server when installing MariaDB.
- OS: CentOS 6.10 (Final) 64bit.
- RAM: minimum 1GB memory.
- HDD: free more then 5GB space. Most providers now offer 20 GB of disk for 1GB RAM VPS, so you don’t need to worry about it.
- User: root
Add MariaDB repository to the server
To install MariaDB via yum and be convenient for later updates, we add MariaDB repository to the server.
MariaDB provides a page that allows you to select the operating system and configure the corresponding repository.
We create a file named MariaDB.repo with the following command.
# yum install nano -y && nano /etc/yum.repos.d/MariaDB.repo
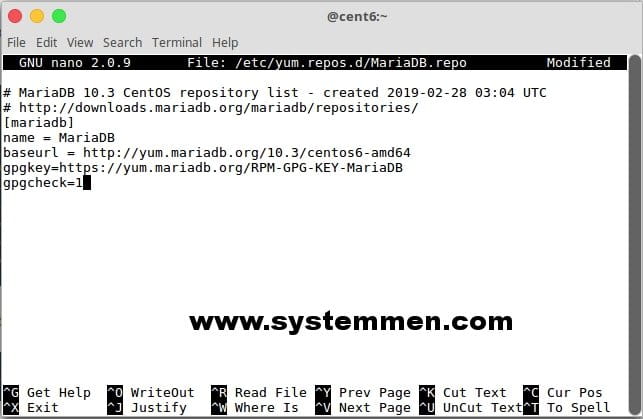
And then copy the content below to the file just created above, save the file.
# MariaDB 10.3 CentOS repository list - created 2019-02-28 03:04 UTC
# http://downloads.mariadb.org/mariadb/repositories/
[mariadb]
name = MariaDB
baseurl = http://yum.mariadb.org/10.3/centos6-amd64
gpgkey=https://yum.mariadb.org/RPM-GPG-KEY-MariaDB
gpgcheck=1
Then update new packages from MariaDB repository.
# yum update -y

Install MariaDB 10.3 in CentOS 6
You type the command below to install MariaDB 10.3. Read more details on this page.
# yum install MariaDB-server MariaDB-client -y
You have to wait about 5 minutes for installation complete.
Type the following command to enable the auto start mysql service when the server reboots.
# chkconfig mysql on
Now start the mysql service.
# service mysql start
Recommended Reading: How to install MariaDB 10.2 on CentOS 6
Terminal screen look like this.
[root@cent6 ~]# service mysql start
Starting MariaDB.190227 21:29:26 mysqld_safe Logging to '/var/lib/mysql/cent6.err'.
190227 21:29:26 mysqld_safe Starting mysqld daemon with databases from /var/lib/mysql
 SUCCESS!
And check status of mysql service.
[root@cent6 ~]# service mysql status
 SUCCESS! MariaDB running (306)
Finally, you have to run below command to secure your mysql first.
# mysql_secure_installation
This process look like below.
[root@cent6 ~]# mysql_secure_installation

NOTE: RUNNING ALL PARTS OF THIS SCRIPT IS RECOMMENDED FOR ALL MariaDB
      SERVERS IN PRODUCTION USE!  PLEASE READ EACH STEP CAREFULLY!

In order to log into MariaDB to secure it, we'll need the current
password for the root user.  If you've just installed MariaDB, and
you haven't set the root password yet, the password will be blank,
so you should just press enter here.

Enter current password for root (enter for none):
OK, successfully used password, moving on…

Setting the root password ensures that nobody can log into the MariaDB
root user without the proper authorisation.

Set root password? [Y/n] y
New password:
Re-enter new password:
Password updated successfully!
Reloading privilege tables..
 … Success!


By default, a MariaDB installation has an anonymous user, allowing anyone
to log into MariaDB without having to have a user account created for
them.  This is intended only for testing, and to make the installation
go a bit smoother.  You should remove them before moving into a
production environment.

Remove anonymous users? [Y/n] y
 … Success!

Normally, root should only be allowed to connect from 'localhost'.  This
ensures that someone cannot guess at the root password from the network.

Disallow root login remotely? [Y/n] y
 … Success!

By default, MariaDB comes with a database named 'test' that anyone can
access.  This is also intended only for testing, and should be removed
before moving into a production environment.

Remove test database and access to it? [Y/n] y
 - Dropping test database…
 … Success!
 - Removing privileges on test database…
 … Success!

Reloading the privilege tables will ensure that all changes made so far
will take effect immediately.

Reload privilege tables now? [Y/n] y
 … Success!

Cleaning up…

All done!  If you've completed all of the above steps, your MariaDB
installation should now be secure.

Thanks for using MariaDB!
Recommended Reading: How to install MariaDB 10.2 in CentOS 7
Open port 3306 in IPtables
MariaDB’s mysql service runs the default port of 3306. If you want to connect from other servers to this database server, you need to open the port on the IPtables firewall.
Warning: You only open port 3306 when needed. If you run a web server type all-in-one combination database, you do not need to do this.
Type the following command to add a rule to IPtables.
# iptables -I INPUT 1 -m tcp -p tcp --dport 3306 -j ACCEPT
Save the current rules to IPtables file.
# iptables-save > /etc/sysconfig/iptables
Check the opened port 3306 with this command.
# iptables -L -n
If you do not see the port 3306, you may have to restart service iptables and check it again.
# service iptables restart
Login to your mysql service
Now, everything seem okey, you can login to your mysql with below command and create your first database.
# mysql -u root -p'pass'
Replace from the pass with your root password that you have set up above.
Conclusion
Through this article, you can definitely install MariaDB 10.3 on CentOS 6.10 server easily without any difficulties. Hope the article is useful to you.
«« How to install Docker on Linux Mint 18How to install Apache 2.4 in CentOS 6 »»


